Scala workshop
How to make the most out of scala MMM
Long time ago CU amiga gave away a copy of ScalaMMM 300 on a cover CD. Of course they did a tutorial on it, but alas, magazine tutorials mainly cover the basics. This led me to the idea of doing a more indepth tutorial on Scala, as well as providing you with an extra service:
From now on, there will be a mailing list concerning Scala for the Ripper. This means that, should you get stuck, you could post a message to the list, and get your answer ASAP, rather than having to wait for the next issue, hoping your question will be answered in the next tutorial. If you want to subscribe to this list, use the following link:Scala list. This is not a one time only thing: for every tutorial I start in your mag, a mailinglist will be opened, to help you get along when you get stuck.
Early beginnings
At its most basic, scala is a program to create slideshows. There's much more to it, but for the fun of it, we start at the beginning. To follow this tutorial, install a version of Scala (such as the one that came with CU-Amiga), and fire it up. You will now be presented by an unusual interface, at least as far as the Amiga is concerned. In this first tutorial, we will create an index page, with buttons that take you elsewhere.
First thing you need to do, is set up the program so that it suits the purpose. We want to have buttons on the index page, that give an audible feedback when clicked. To activate this option, click the button labeled "system" (bottom right of the main window). You will now see a new page. Top right there's a button labeled "user-interface", with two arrows next to it. Click the right arrow two times, the button will now read "Scala Buttons". Click on the "Mark sound:" button, and select a sound sample from the requester. Do the same with the "Select sound:" button, choosing a different sample this time. Now, once you have created buttons, it will give a sound when your mouse pointer is over it, and a different sound when you actually click a button. After closing this screen (save configuration), you will be taken back to the main page.
As Scala is based on pages, you need to create a new page first. So, bottom left, choose the New button from pages. Now choose a page from the requester, this will be your background page. Just click on okay on all following requesters, until you're back at the main interface. You will now see the name of your page in this window. Click on the sound button next to your page, and select load sound. This time, choose a mod from your "music" directory. This will let scala play some music after loading this page.
Now it's time to start creating some buttons. Double click on your page name, and you should be taken back to your page-editor. Now it gets complicated. We would want a number of buttons, appearing in a nice way, wouldn't we? Well, let's do just that!
Creating buttons
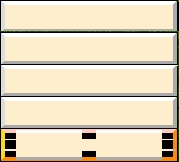
On right you'll see some drawing tools (square, line, circle). Select the square, and draw out a rectangle, the size of the button you want. Repeat this process four times, making sure the buttons appear right under eachother. As a help, you can turn on the grid option. See the screenshot to know what I mean.
 Now, you might want to select a nice way for the buttons to appear? Select the first button you made, and click the "in" button bottom left. I used the effect "Rollon south" here. For the other buttons, select the same "in" button, this time selecting the "chainlink" icon. Click on show to see the effect. Now some text for the buttons?
From the font tool, select a font, and type in a text for all of the five buttons. If you now "show" your page, you see the texts not linked to your buttons. This is not pretty. So, click on the "List" button. You now see a list with boxes, and your texts. Through drag and dropping, make sure the list starts with the box with the start effect, followed by the text for the first button, next box, next text etc. Make sure all text objects have the "chainlink option" set. We now have a page that looks like it has buttons, but this is not the case. You have to set up the buttons manually. To do so, select the buttons... button. Draw out five buttons the size of the boxes, and place them over those boxes. Now you have your buttons set up.
Now, you might want to select a nice way for the buttons to appear? Select the first button you made, and click the "in" button bottom left. I used the effect "Rollon south" here. For the other buttons, select the same "in" button, this time selecting the "chainlink" icon. Click on show to see the effect. Now some text for the buttons?
From the font tool, select a font, and type in a text for all of the five buttons. If you now "show" your page, you see the texts not linked to your buttons. This is not pretty. So, click on the "List" button. You now see a list with boxes, and your texts. Through drag and dropping, make sure the list starts with the box with the start effect, followed by the text for the first button, next box, next text etc. Make sure all text objects have the "chainlink option" set. We now have a page that looks like it has buttons, but this is not the case. You have to set up the buttons manually. To do so, select the buttons... button. Draw out five buttons the size of the boxes, and place them over those boxes. Now you have your buttons set up.
Making the buttons act
To do this, click okay until you are back at the main interface, and create a new page as described above. Click on whipe, and select a nice effect from the list. Now double click on your first page again, select "buttons", and for the first buttons select goto:whateveryoucalled your second page. You can do similar for the other buttons. Experiment with the different button effects, and you have your first basics set up.
As you can see, this is already more than your normal slideshow, we have created an interactive slideshow! Fun, but pretty useless when you have to select everything with a mouse. But, imagine the scenario where you have a touch-screen monitor, and hook it up to an Amiga. You can now have your presentation running in a shop, where customers would have to touch the button on the screen, and the presentation acts accordingly. How to make a presentation that you could make money with (selling it to a company), will be explained in the following tutorials. Next issue will not only see tutorial 2 on scala, but also an article about how to make money with your Amiga. It is my experience that small businesses want to pay money for such a presentation, aspecially if you point out to them that the initial outlay for an Amiga isn't nearly as high as for a so-called dedicated multimedia machine, and you can do just the same with it.
If you're interested in learning more about Scala, keep your eyes peeled for the next issue of the Ripper, and subscribe to the Ripperscala list mentioned above.
See you in the next issue of the Ripper,
Dirk